
About two years ago I was recommended a video about using storage totes to make a raised bed garden. I was actually in the process of cleaning up the house at that time, so I had a couple large totes that had been emptied out. My first try with them I made one and tossed some sunflower seeds in it, and they did fine. Last year I had two raised tote planters. This year I am expanding! I thought it would be fun to share how I set them up so that maybe you can try doing something similar in your garden! You should be able to source most of your supplies for this for cheap or free.
- 16 gallon plastic totes
- You can re-use a plastic container of any size, provided it is food safe. If you don't have some laying around, ask family/friends or look for yard sales/estate sales. I source a lot of garden materials by asking my friends for their trash. If you have concerns about using plastic to grow food, you can give this a read. Long story short, yes a small amount of plastics will leach into the plant, and therefore your food, but the amount is so small that it is negligible to me.
- Smaller, secondary planters
- Depending on what you plant in your tote, you may have some free space, but not want to put another plant in there in worries of overcrowding the roots. When this happens, you can place a planter in your tote. These are good for a single herb or small flowers. I re-use transport planters for this, or get the small planters from the dollar store. (Photo example of this towards the end of the post)
- You can also place a plant in the space underneath the chair if bending over/reaching won't be an issue for you. I have pepper plants in fabric grow bags under mine, but you can use whatever. I am able to get floral buckets from Kroger for free, and those work well here too.
- Compost materials
- You are going to use these as free filler for your planter and for feeding your plants. You don't need to know all the details of how to compost (I strongly recommend learning how to compost if you don't know already!); you are going to want some sticks and broken up branches, shredded leaves, paper, or cardboard, and some kitchen scraps. Coffee grounds, tea bags, veggie skins, banana peels, and eggshells are good for compost.
- Plastic lawn chairs
- I got these for free from a family member who used to host all the family get togethers. Sometimes you can find these for free at the side of the road, especially after graduation season or the end of summer.
- Some sort of tool to put holes in your containers
- I use a cheap soldering iron. For me it feels safer to just melt away holes rather than to try and cut them through with something and end up having my hand slip. Probably wear a mask of some sort of your choose to go the soldering iron way, and do it outside too.
- Dirt
- I fill my totes fairly full of compost and then dump a .75 cu ft bag of top soil on top. You can find these for ~$2.50 or so (at least in my area right now in 2025) if you shop around for who has dirt on sale that week. The bags say "not for use in containers", I know. I have not had any issues using it. If you want you can use potting soil, but it is just so much more expensive I would rather save that for my actual pots.
- Plants
- You will need to do your own research and experiment on what you can fit in your totes. Part of gardening is fucking around and finding out. You can always keep an extra tote to move plants into if any totes are starting to look a little crowded. As for getting cheap/free plants; Check if your library system participates in a Seed Library program! Awesome way to get free seeds and to show the library that local folks are interested in gardening!
- Time, patience, sunshine, and water
Step 1 - Get your bin and add some drainage holes

I usually put in a couple extra holes around where I plan to put my planter underneath so the extra water can drain onto the plant underneath. It ends up making a l
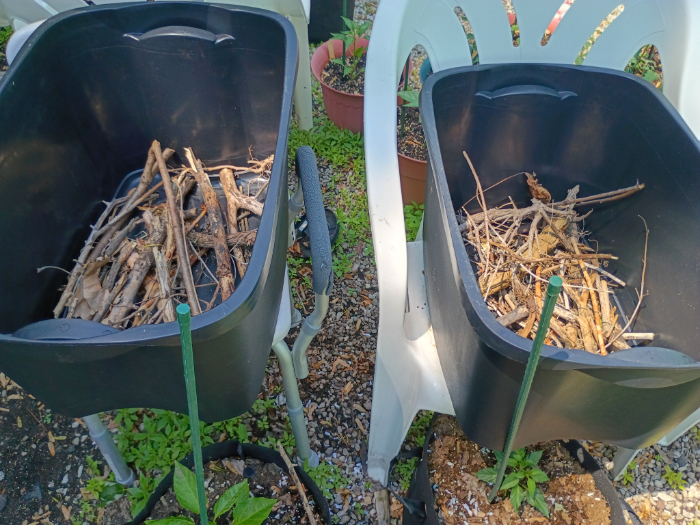
Step 2 - Pick up sticks
Really easy to do after a storm. This helps fill out the bottom a little bit and imo gives a buffer to keep the drain holes from getting too clogged up with dirt or compost. I just put as much as an even layer as I can, breaking up any bigger branches
Step 3 - Make a compost sandwich
I layer my bin with a thick layer of brown material, a thin layer of green, and then more brown on top. Burying the greens keeps your compost from attracting too many pests. If you aren't too familiar with composting browns = shredded leaves, paper, and cardboard; greens = kitchen scraps (avoiding any meat or dairy). You want to fill up a good chunk of the bin and lightly compact it as you go. However, you also don't want to compact it down so much that water struggles to flow through. As this stuff breaks down it will lose some bulk, but as long as you fill it decently full it shouldn't be an issue.

Step 4 - Dirt time
Dump your dirt on top and you are ready to start planting! If you look at my bins, the dirt doesn't go all the way to the top, and it doesn't need to. As long as about 3/4th of the bin is full from your compost and dirt, you should be good. You can just pour the dirt right on top and even it out, don't mix it into the compost.
After that you can add your plants or seeds. You don't need to worry if the plant is touching the brown parts of your compost a little bit, but if it is digging into the green parts, you probably should add some more browns or dirt. As the summer comes, your compost will break down and you will lose a couple inches of material, but you should still have enough for your plants. At the end of growing season, I remove the dead plants and leave the totes out over winter. By the time spring rolls around next year, most of your compost in your totes should be totally broken down (mine still had some leaves in it, but that was about it). The sticks won't break down much, and can be reused year after year.
Another way to add some additional compost to your plants is by giving them a weak compost tea that you can continually make right in the planter. This is kinda hard for me to explain, I hope this makes enough sense; You layer your secondary planters. The one on top contains your plant and dirt, and the planter it is stacked in contains some food scraps/compost. When you do water your totes, water the secondary planters first. Once established, when I lift the secondary planters up, they usually have a few buggies or worms underneath :) This unfortunately won't really fertilize your secondary planter itself though, so you still need to make sure it is getting the nutrients it needs to grow too!

I am really expanding on gardening using these this year. Originally I planned to only have 4 tote planters, but now I am up to 8. Although it may not be the prettiest looking setup, it will allow you to grow a decent amount for cheap in a small space.
- Samson
no subject
Date: 2025-06-06 04:32 am (UTC)I've regrettably always been inconsistent with my gardening attempts, but I am taking notes... 👀
Side note, I love the wind chimes!
no subject
Date: 2025-06-08 10:52 am (UTC)Thank you! I'm a big wind chime fan :] The chicken one has solar lights too! it isn't super bright at night but it's still cool